doctor - Best Private Hospital in Dubai Al Mankhool | IMH Dubai

Suffering from Nasal Blockage & Congestion?

A new non-surgical treatment in the form of KOS therapy might be the answer for you

Allergic Rhinitis:

Symptoms of Rhinitis such as breathing difficulty, nasal congestion, nasal stuffiness, sneezing, post nasal discharge, and cough are common among patients.Allergic Rhinitis

This could be allergic rhinitis which is usually seasonal, and is associated with itchy nose, eye or throat. Patients can usually get relief with anti-allergic treatment such as with anti-histamines and with steroid nasal sprays.

Non-Allergic Rhinitis:

But there is another form of rhinitis (non-allergic rhinitis) which is not seasonal, is present round the year and where the symptoms of nasal congestion/nasal stuffiness do not get relieved with the aforementioned treatment. Patients with hormonal rhinitis (pregnancy associated rhinitis), rhinitis associated with hypothyroidism,rhinitis associated with changes of temperature (vasomotor rhinitis) or with rhinitis medicamentosa (patients addicted to nasal decongestants such as Otrivin) also face a similar dilemma.

There is a help available now in the form of KOS therapy for the aforementioned type of rhinitis (Non-allergic rhinitis).

KOS Therapy:

Kinetic Oscillation stimulation(KOS) is a new method to treat non-allergic rhinitis and primary nasal congestion and stuffiness.

The treatment is non-invasive, performed in an outpatient clinic, without anesthesia and is very patient friendly.

    • Benefits For the patient:


  • Patient friendly
  • Not surgically invasive and no anesthesia needed
  • No scars or bleeding
  • No pharmaceuticals
  • Fast acting relief, or within a few days for responding patients
  • A positive lasting effect of 4-10 months for responding patients
  • Typically repeated treatments have a stronger and longer lasting effect for responding patients

Principle of action of KOS therapy:

The KOS therapy stimulates the nasal mucosa and the autonomic nervous system(ANS), which may give the responding patients almost instant relief or within few days.KOS Therapy has been found to be effective for months following the treatment.

The treatment procedure:allergy treatment Dubai

The procedure is very simple.

An inflatable balloon at the end of the catheter is inserted into one nasal cavity at a time. Short kinetic oscillating stimulation in the form of vibrations is provided to each nostril which is intended to reset the balance of the nervous system and sensors, thus providing relief from nasal congestion and blockage.

         allergy treatment in Dubai    Best Allergy Treatments in Dubai    Allergy Clinic in Dubai    Allergy and Immunology

KOS Therapy has been newly introduced at the ENT department of International Modern Hospital; one of the few centers in Dubai offering the treatment.

The author, Dr. Rohit Gulati, is a Specialist Otolaryngologist and ENT Surgeon at International Modern Hospital with more than 13 years of experience in the field of Otorhinolaryngology.

Preventing Dry, Irritated Winter Skin

Hydrate: 

Low humidity paired with artificial heating is the perfect recipe for parched skin. Protecting your skin should start with adequate water intake, so keep your bottle with you and stay hydrated during the day, even if you aren’t sweating. In addition, you can use a hydrating mist or toner on skin before applying a moisturizer. If you’re feeling extra dry, this step can go a long way to soothing irritation and helping your moisturizer do its work.

freshed face beauty

Moisturize:

Your skin’s protective layer can be damaged during winter, which prevents it from maintaining a normal amount of oil and protecting itself from water loss. Pair hydration with a good-quality natural moisturizer for both your face and body. For face, look for a serum, which offers the most concentrated source of protective oils. Don’t worry, serums won’t make your skin oily!. When paired with a hydrator like the Hydrating Accelerator, you’ve got a wrinkle-fighting, skin-plumping, winter-protective duo to keep your skin glowing throughout the season. For body, look for a balm or body oil that is rich in essential fatty acids and antioxidants. With a high concentration of camellia seed oil, this organic body serum absorbs deeply and helps restore skin’s moisture balance.

Be Gentle:

Are you combating acne and oily skin with harsh soaps? Are you using scented shower gel to wash your face? If so, now’s the time to nix cleansing products with alcohol, fragrance, preservatives, and dyes. For many, these kinds of products can exacerbate underlying skin problems, especially in winter. Instead, try a soap-free cleanser, a gentle soap-based cleanser, or an oil cleanser. By protecting your skin from harsh detergents, it will maintain its balance and be better able to protect itself from water-sucking conditions. Making the switch early on means less irritation and less reparative work on your end.

Treat: 

You can’t moisturize dead skin. If you’re looking flaky or lackluster, on a weekly basis use a gentle buffing exfoliant or antioxidant mask to gently reveal soft, glowing skin. Make sure to follow up with a hydrator and moisturizer! Also, be sure to keep a treatment balm for hands and lips with you at all times. Travel-size products are ideal for stashing in a purse, briefcase, or desk, and can be a simple skin-saving solution.

caucasian smiling woman applies moisturizer onto face

Nourish:

Oh, winter, how you toy with us. With sweaters and blankets keeping us cozy, cookies and cocoa add to our winter warmth, but they also contribute to dull skin, breakouts, and more generally, a sluggish demeanor punctuated by thoughts of regret. No one wants that, so indulge responsibly and try noshing on natural and whole-food snacks that are packed with vitamins, minerals, and healthy fats. Staying hydrated and nourished will help your skin from the inside out.

Winter Lipcare

Having healthy lips in winter, maybe a dream come true for many. The skin on your lips is very thin and has no oil glands to prevent it from chapping. So it is completely your potential to keep them healthy. Even the most expensive lipstick will not cure the dryness of your lips. Protecting your lips from dryness is not just important for appearance, but also for health. You may end up with bacterial infections, cold sores and other problems if they are chappy. They will also effect your smile and damage your self esteem..

Lip-balm-dries-lips-winter

Causes For Chapped Lips:
There are different reasons for chapped lips, but here are a few that are extremely common:
1. Weather change – heat or cold
2. Aging plays a very important role in causing dry lips
3. Biting your lips will result in bleeding and cracked lips
4. Licking your lips is the worst habit!
5. Touching lips with fingers will transfer the bacteria on your hands to your lips and cause infections ( also aggravate chapped lips)
6. Dehydration
7. Usage of excessive chemicals (Lipsticks)
8. Any form of alcohol can provoke skin irritation
9. Any product with chemical preservatives
10. Leaving the lipstick on, while going to sleep
11. Using lip balms with alcohol, retinol and menthol
Women who like to chew on their lips wearing lipstick, will consume about 4 to 9 pounds of lipstick in their life time! All these may seem common but they affect your health, severely. They make the skin on the lips dry, rough and sensitive.

Protecting Your Lips:
For a long lasting moisture on the lips, you need to treat them from outside as well as from the inside. It is extremely important to consume plenty of water everyday. This will keep your lips moisturized from within, as it nourishes and protects the skin. If your diet has low levels of vitamin B, you are more prone to chapped lips. Including red meat, fortified cereals, skim milk, Swiss cheese, eggs and silken tofu to your diet will bring about a great change in your lips. The most important points to protect your lips are:
1. Quit smoking! It will completely spoil your lips and it may become too late to regain the color and texture of your lips.
2. Always keep your lips moisturized by applying a natural lip balm.
3. Apply lip balm before going to bed.
4. Licking your lips is a bad habit. Yes, it may look like it is keeping your skin moisturized for a moment, but it worsens the situation! The wind will dry your lips in a minute and you have to keep licking them. This process is unending and will become a major condition, by spreading away from the lips. So it is better to keep them moisturized with a lip balm.
5. For the winter season, you need to choose lip balms with extra moisturizing agents. The lip balms you choose should have a long lasting effect. They will keep your lips moisturized for a longer period of time. It is an added advantage if the lip balm contains SPF in it. The lip balms which contain the following are the best for your lips.

 Shea Butter: Shea butter acts as a natural sun block and it has allantoin, which is a healing agent. This is the best ingredient to have in a lip balm. It gives a soothing effect to the lips.
 Aloe Vera: As we all know, Aloe Vera consists of anti-inflammatory and anti-bacterial agents which protect the skin from any kind of infections. Aloe Vera is also very soothing and moisturizing, when applied on the lips.
 Glycerin: Glycerin is a natural skin softer and it holds agents that bind moisture and skin together.
 Jojoba Oil: It is one of the best nourishing oils for the skin. It softens and lubricates the skin, when it is applied.
 Vitamin E: It is a powerful antioxidant and moisturizing agent. It protects the lips from the sun.
 Coconut oil: Coconut oil relieves dry and itchy skin. It also softens and moisturizes the lips.
 Beeswax: It is a non allergic skin softener, that moisturizes and nourishes the skin. It consists of anti-inflammatory and anti-bacterial agents that guard and protect the skin.
 Vitamin A and D: These are pro-active vitamin complexes that are skin friendly. They contain fatty acids that are easily absorbed into the skin. They help to soothe and heal the skin effectively.

6. If you are in a habit of using lipstick everyday, choose the ones with moisturizing ingredients. It is better to avoid lipstick, especially in winter. Instead, you can use a moisturizing lip balm, with a tint of lip color.
Home Remedies To Treat Chapped Lips:
The golden secrets of gaining fresh, soft and luscious lips are by using home remedies. They are cheap, surely available and accessible at any time. If you use these secret tips, your lips will look moisturized and healthy, even without using lipsticks or lip balms. So try these simple remedies to cure your lips and enjoy an ever lasting moisture.
Honey:
Using honey to moisturize your lips is the best. You need to apply this in the night, before going to bed. It is the best way to clean your lips. It will also cure dark lips, caused due to sun exposure.
Ghee:
Ghee has the same effect on the lips as honey. You need to apply a few drops of ghee on your lips, before going to sleep. It will give you smooth and soft lips, within no time.
Green Tea Bags:
The oldest home remedy followed by many is green tea bags. Press one used green tea bag, against your lips for at least 4 minutes. You need to do this everyday to increase the moisture of your lips. This is the best natural remedy used to cure chapped lips.
Lemon Juice:
This remedy will help to prevent aging of the skin. It nourishes the sensitive skin on your lips, leaving them smoother and softer than before. Take a small bowl and mix one teaspoon of cream (milk) with 3 drops of lemon juice. Place the bowl in the fridge for an hour. Remove the mixture and apply it on and around the lips, before going to sleep. If you repeat this procedure for three days, you will notice best results. You can also continue it everyday to prevent the lips from aging.
Rose Water and Glycerin:
Rose water and glycerin is a great combination. It provides glowing and amazing skin, with regular use. You need to take a tablespoon of glycerin and rose water. The measurement may vary according to the need of each person. You need to take equal quantities of both the ingredients. Mix it together and apply this mixture to your lips, as well as your whole face, before going to sleep. You will see mind blowing results in 5 days time!
Glycerin and Honey:
Honey and glycerin will help to prevent wrinkles and dry skin. You need to take a teaspoon of honey and add very few drops of glycerin to it. Apply this mixture on the lips and leave it on for 15 minutes. Wash it off with normal water. Apply a few drops of glycerin again and leave it over night. This tip is extremely useful and prevents the lips from wrinkling.
Jojoba Oil:
This remedy gives a natural instant relief from severely chapped lips. All you need to do is take a few drops of jojoba oil and apply it on the affected area. You need to leave it on for about 15 minutes. Jojoba oil helps in a speedy recovery of your lips. It will get the moisture back into your lips, by nurturing the skin cells in the lips. It helps in building new skin cells which will repair the skin immediately.
Cucumber:
Cucumber is a vegetable with all the goodness in the world. You need to take a peeled cucumber and crush it. Extract the juice and apply this onto your lips. Leave it on for 20 minutes and wash off with normal water. You will see a major difference if you use this remedy regularly.
Sugar Scrub:
You can exfoliate your lips by using a good scrub. Even a small brush will do to remove the dead cells on your lips. But the best scrub for lips is sugar. It is easily accessible from your kitchen. You can take 1/2 teaspoon of sugar and add 2 drops of olive oil to it. Scrub your lips gently with this mixture. After 3 to 5 minutes of scrubbing, you can wash it off with normal water. Apply a good lip balm after wiping your lips with a cloth. This remedy will make you lips shiny and softer than before.

How to Prevent Eye Strain While Watching TV

If you spend your whole day using the computer and then go home and watch TV, your eyes will definitely start to feel the strain. Here are some simple tips to prevent eye strain while you watch TV.

reality-clipart-tv1 Watching-TV-010

Keep the lights on.
We all love snuggling up in bed and watching TV with the lights off, but this is really bad for the eyes. Keep the lights on when you watch TV, so that your eyes don’t get tired.
Take breaks.
Instead of keeping your eyes glued to the TV for hours on end, take frequent breaks to prevent eye strain. Blink often, and every time there is a commercial, get up and walk around for a few minutes. This will not only relax your eyes, but prevent back problems as well. While you are walking around, try to focus your eyes on objects that are far away.
Reduce the glare.
Try to position yourself so that there is no glare on the screen. One way to do this is to ensure that the screen is at a 90˚ angle from any source of light. You can also wear anti-glare glasses to protect your eyes from the glare.
Maintain the right distance.
You should be 8-10 feet away from your TV. It should be at the correct height, either at your eye level or just below it. You should never be looking up at it.
Relieve the strain.
If your eyes feel strained after watching TV, there are certain things you can do to make them feel better. Massage your eyes gently, apply a hot compress on them or do some simple eye exercises. Make it a point to get 8 hours of sleep every night to rest your eyes.
Upgrade your TV.
If you have been trying to convince your spouse that you’ll need a new TV, you finally have the perfect excuse! If you’re still using an older television, switch over to a flat screen one, since those give off less of a glare. Also, the bigger the better, since the larger the screen is the less your eyes have to strain to focus.

Prepare your kids for exams!!!

Exams are important milestones in your children’s education. Younger children need much more assistance than older children in preparing for exams. The guidance that you provide in the early stages will enable your children to study with discipline and dedication later on, on their own. If your children are still in kindergarten or primary classes, you will need to invest much more time. However, with older children, you may face problems of a different kind—disobedience and rebellion, which require greater tact.

Prepare your kids for exams Prepare kids for exams

• Never let your children postpone studying until a day before the exams. This will only increase their anxiety and stress levels. Preparation is the key to success. Don’t listen to any excuses and don’t be swayed by assurances. The best course is to have your children study for some time everyday. Even if this is not possible, ensure that they begin preparing for the exams at least two to three weeks in advance.

• Do not impose yourself on your children. Some children require more support while others are happier studying on their own. This depends on your children’s nature. However, let them know that you’re always there to help them.

• It is not enough to read up matter. Your children should be able to recall the same in the examination hall. Hold question and answer sessions where you ask them random questions on the subject once they have finished studying.

• Prepare a timetable for each child. You can cover subjects in the order of the examination schedule or you can tackle difficult subjects first. For younger children, two to three hours of study a day should suffice. Children in the secondary and higher secondary classes should study for four or five hours a day when the exams are due. Alternate languages and practical subjects like mathematics to minimise boredom.

• Especially for older children, access to question papers from previous years is a must. These may be available in the school library, with teachers or you can secure them from the senior students. Have them solve at least one or two papers in each subject, within the given time limit. This is like a rehearsal and helps in mitigating exam nerves. It will also give your child an idea of how much time to allot for each question.

• Don’t allow your children to stay up or wake up too early. Make sure that they get at least eight hours of sleep. Inadequate sleep affects the brain’s functioning and will reduce your children’s retention. Discourage use of caffeine or other stimulants to remain awake.

• Children these days suffer from as much stress as adults. Do not pressurise your child ever. Do not entertain negativity and empower them with confidence if they start moaning about previous performances.

• Create a study-ritual for your children. Encourage them to use the same place to study everyday, preferably somewhere quiet and pleasant. The outdoors is a great option as well. Let them be silent and make a resolve to study well before beginning the session. End every session with a revision of what has been covered. Set small goals–one or two chapters or even topics. If they are studying for long durations, schedule breaks every one or two hours. Let them do what they like such as go for a walk, meditate or solve a puzzle.

• Older children may benefit from group study, especially for subjects that they find difficult. It is preferable if your child can go to his friends’ houses rather than having them over. This way, he can leave if the session is proving to be a waste of time.

• On the D-Day, wake your children up well in time and serve them a light breakfast. Set aside time for a disciplined revision. Teach them relaxation exercises. Ensure that they have their pens and pencils, examination pad and other necessary items before leaving the house. Wish them luck and hope for the best!

Don’t Procrastinate with Pelvic Pain

If you have recurring pain in your pelvis or bladder, you probably don’t think “interstitial cystitis.” It’s a long name for a condition that can be difficult to diagnose because it can have multiple, interrelated causes.

Interstitial cystitis, or “IC,” is a chronic health issue in which patients feel pain or pressure in the bladder area. An estimated 4 million people in the U.S. suffer from IC, approximately 80 percent of them female.

Pelvic Pain Women

Several different conditions – or combinations of conditions – can cause IC. That’s why it’s important to consult with your physician if you’re experiencing pelvic pain. A proper diagnosis may require time and you don’t want to suffer any longer than necessary.

To further complicate the diagnosis, symptoms range from mild to severe and vary from person to person. Any of the following could indicate IC:

  • Pain ranging from ‘nagging’ to ‘intense’ in the bladder and surrounding pelvic region
  • A sense of urgency and/or increased frequency of urination
  • Pain that worsens during menstruation
  • Painful sexual intercourse for women
  • Pain or discomfort in the scrotum or penis
Pelvic Pain Man

For many, IC feels like a bladder infection, though antibiotics make no impact because there’s no infection to treat. The exact cause of pain with IC is actually not clear, but several theories exist. These range from an allergic response to autoimmune reaction to an excessive inflammatory response to even the slightest stimulus which would not generally be perceived as painful in a patient who does not have IC.

IC can frustrate patients because besides a challenging diagnosis, not everyone responds the same way to the same treatment. In addition, IC treatments can take several weeks to several months to provide relief.

If you suffer from pelvic pain, begin with an open discussion with your physician. Whether or not you are diagnosed with IC, you can start to work toward solutions to your condition. Treatment options, such as pharmaceuticals, nerve stimulations or surgery can be evaluated and your doctor can help you decide on the appropriate approach for you.

Hysteroscopy

What is hysteroscopy?

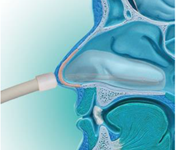
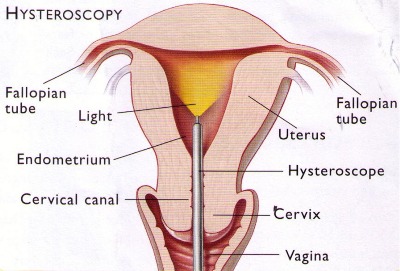
Hysteroscopy is a procedure that allows a doctor to look inside the uterus in order to diagnose and treat causes of abnormal bleeding. Hysteroscopy is done using a hysteroscope – a thin, lighted tube that is inserted into the vagina to examine the cervix and inside of the uterus.

hysteroscope

Why is hysteroscopy done?

One of the most common uses for hysteroscopy is to find the cause of abnormal uterine bleeding. Abnormal bleeding can mean that a woman’s menstrual periods are heavier or longer than usual or occur less often or more often than normal. Bleeding between menstrual periods also is abnormal. Hysteroscopy may be either diagnostic or operative.

What is diagnostic hysteroscopy?

Diagnostic hysteroscopy is used to diagnose problems of the uterus such as abnormal uterine bleeding, infertility, repeated miscarriages, adhesions, fibroids, polyps, or to locate displaced intrauterine devices (IUDs). It may also be used to confirm the results of other tests such as hysterosalpingography (HSG). Other instruments or techniques, such as dilation and curettage (D&C) and laparoscopy, are sometimes used in conjunction with the hysteroscopy.

What is operative hysteroscopy?

Operative hysteroscopy is used to correct an abnormal condition that has been detected during a diagnostic hysteroscopy, avoiding the need for a second surgery. During operative hysteroscopy, small instruments used to correct the condition are inserted through the hysteroscope.

When is operative hysteroscopy used?

 Hysteroscopy may be performed to correct the following uterine conditions:

  • Polyps and fibroids – Hysteroscopy is used to remove these non-cancerous growths found in the uterus.
  • Adhesions – also known as Asherman’s Syndrome, uterine adhesions are bands of scar tissue that can form in the uterus and may lead to changes in menstrual flow as well as infertility. Hysteroscopy can help locate and remove the adhesions.
  • Septums ­ – Hysteroscopy can help determine whether you have a uterine septum, a malformation of the uterus that is present from birth.
  • Infertility – tubal blockage at uterine end can be opened through hysteroscopy by cornual cannulation
  • Abnormal bleeding – Hysteroscopy can help identify the cause of heavy or lengthy menstrual flow, as well as bleeding between periods.
  • Postmenopausal bleeding – Hysteroscopy is also performed to determine the cause of unexplained bleeding or spotting in postmenopausal women
  • Removal of foreign body or a missing IUCD

What are the benefits of hysteroscopy?

Compared with other, more invasive procedures, hysteroscopy may provide the following advantages:

  • Shorter hospital stay
  • Shorter recovery time
  • Less pain medication needed after surgery
  • Avoidance of hysterectomy
  • Possible avoidance of “open” abdominal surgery

How safe is hysteroscopy?

Hysteroscopy is a relatively safe procedure. However, as with any type of surgery, complications are possible. With hysteroscopy, complications occur in less than 1 percent of cases and can include:

  • Risks associated with anesthesia
  • Infection
  • Heavy bleeding
  • Injury to the cervix, uterus, adjacent organs
  • Intrauterine scarring

When should the procedure be performed?

It may be recommended to schedule the hysteroscopy for the first week after your menstrual period. This timing will provide the doctor with the best view of the inside of the uterus.

What type of anesthesia is used for hysteroscopy?

Anesthesia for hysteroscopy may be local, regional, or general:

How is hysteroscopy performed?

Prior to the procedure, one may be prescribed a medication to help you relax. You will then be prepared for anesthesia. The hysteroscope is inserted through vagina and cervix into the uterus. Saline is then inserted into the uterus, through the hysteroscope, to expand it and to clear away any blood or mucus. A light shone through the hysteroscope allows the doctor to see inside the uterus and the openings of the fallopian tubes into the uterine cavity. Finally, if surgery needs to be performed, small instruments are inserted into the uterus through the hysteroscope.

The time it takes to perform hysteroscopy can range from less than 5 minutes to more than an hour. The length of the procedure depends on whether it is diagnostic or operative and whether an additional procedure, such as laparoscopy, is planned at the same time.

How will I be prepared for hysteroscopy?

If you are having general anesthesia in the hospital, you will be told not to eat or drink anything for a certain period of time (usually after midnight the night before) before the procedure. Routine lab tests may be ordered as well for women having a hysteroscopy in the hospital. You will be asked to empty your bladder and your vaginal area will be cleansed with an antiseptic

What can I expect after the procedure?

If regional or general anesthesia is used during your procedure, you may have to be observed for several hours before going home. After the procedure, you may have some cramping or slight vaginal bleeding for one to two days. However, if you experience any of the following symptoms, be sure to contact your doctor:

  • Fever
  • Severe abdominal pain
  • Heavy vaginal bleeding or discharge

Will I have to stay in the hospital overnight?

Hysteroscopy is considered minor surgery and usually does not require an overnight stay in the hospital. However, in certain circumstances, such as if your doctor is concerned about your reaction to anesthesia an overnight stay may be required.

Who is a candidate for this procedure?

Although there are many benefits associated with hysteroscopy, it may not be appropriate for some patients. A doctor who specializes in this procedure will consult with your primary care physician to determine whether it is appropriate for you.

Limb Lengthening

How Does It Work?

The limb lengthening process works by gradually growing new bone and soft tissues (skin, muscle, nerves, blood vessels, etc). This new growth is called tissue regeneration.

Bone and soft tissue regenerate when they are distracted (pulled apart) at a very slow rate of approximately 1 mm per day. If the rate of distraction is faster than this, bone may fail to form between the two ends of the bone that are being pulled apart. Then, soft tissues, such as muscle, may experience contracture (get too tight) or nerves may become paralyzed. If the rate of distraction is too slow, premature consolidation may occur (the bone may consolidate too soon), preventing the lengthening device from further pulling it apart.

There are many different lengthening devices used. The most common are external fixators, which are devices that attach to the bone by means of thin wires or thicker pins that have a screw threading at their attachment to the bone. There are also lengthening devices that are fully implanted inside the bone. These devices do not require external pins. The different devices are described separately.

There are two phases of lengthening until the bone is fully healed: the distraction phase and the consolidation phase. The distraction phase is the lengthening phase. After the desired length is obtained, the newly regenerated bone is still very weak because of lack of calcium within it. The hardening and calcification of this new bone is called the consolidation phase.

METHODS OF LENGTHENING:-

A variety of orthopedic devices are used to distract the bone and soft tissues. The decision regarding which device to use is an individualized one dependent upon the desired correction.

There are two general types of devices: external fixators and internal fixators. The external devices attach to the bone from outside the body by means of wires and threaded pins. The internal devices are implanted inside the body and lie on the bone or inside the marrow cavity of the bone.

The best known and most versatile techniques are with monolateral (one-sided or straight bar) external fixators (e.g., Orthofix, EBI) and circular external fixators (e.g., Ilizarov, TSF). External fixators are applicable to almost all cases. To shorten the time in the external fixator, combinations of the external fixator method with an internal nail to perform the lengthening over nail (LON) technique. However, this method is not applicable to all cases.

A fully implantable self-lengthening nail (ISKD) is also used. It has an internal mechanism that performs the lengthening and thereby eliminates the need for an external fixator. This method is available for certain cases.

External Fixation Alone
When only an external fixator is used, the fixator needs to remain in place for both the distraction and consolidation phases. If the fixator were removed at the end of the distraction phase, the new bone would collapse and re shortens. Therefore the external fixator needs to remain in place until the regenerated bone appears solid enough on the radiographs (x-rays). At that point, the device can be removed. Often, a cast is applied to temporarily protect the bone from breakage for an additional short time.

The total time in the external fixator can be estimated to be approximately 1 month for each centimeter lengthened in children and 1.5 to 2 months or longer per centimeter in adults.

Lengthening over Nail
Lengthening over Nail or LON was developed in order to decrease the external fixator treatment time, eliminate the need for post-removal casting, and decrease the risk of breakage of the new bone.

With LON, a metal rod is inserted into the bone along with the external fixator. The rod fits in the marrow cavity of the center of the bone, and the external fixator is applied around the peripheral part of the bone so that the external fixator pins do not come in contact with the metal rod. The bone is lengthened as described above.

After lengthening is completed, the patient goes back to the operating room for the insertion of special screws that lock the rod to the bone. With screws at both ends of the rod on opposite sides of the lengthening zone, the external fixator is no longer needed, and is removed during the same operation.

Therefore, the total external fixation treatment time is much shorter, and is equal to the distraction phase. This usually reduces external fixator time to less than half.

Fully Implantable Lengthening Nails and Prostheses
The most recent development is that of a fully implantable devices that can lengthen the limb from within. There is no need for an external fixator. This has many advantages, including no risk of pin infection, no muscle tethering by the pins, less pain, and better comfort. Unfortunately, , this method is mostly limited to older children and adults. Therefore, many patients cannot be treated by this method.

Leg length discrepancy correction

limb1

Bow leg correction

limb2

×